What is Google Drawings and 10 Creative Ways You Can Use It

In this article, you’ll learn how to access and use Google Drawings. We’ll also explore a few useful applications for Google’s online drawing application.
If you’ve never heard of Google Drawings before, or even if you’ve used it briefly, you may be surprised just how versatile and useful this web app is. But what is Google Drawings exactly, and why should you be using it more?
In this article, you’ll learn how to access and use Google Drawings. We’ll also explore a few very useful applications for Google’s seemingly simple online drawing application.
What is Google Drawings?
There are two quick ways to access Google Drawings. The first is simply to visit the Google Docs URL for it.
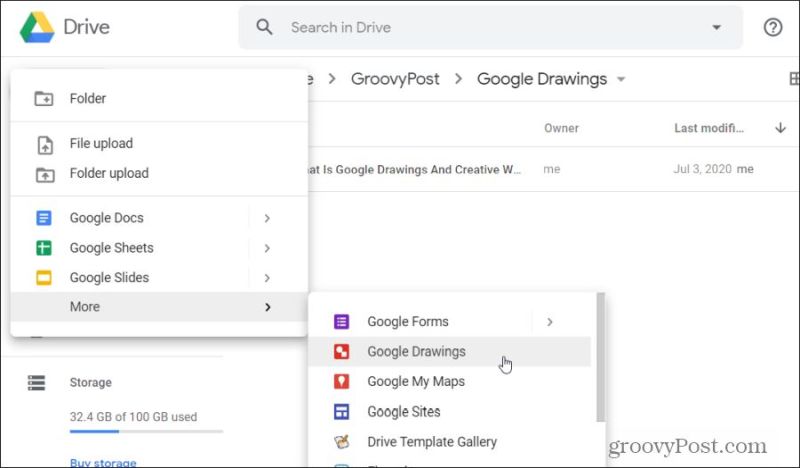
Or, you can visit Google Docs, navigate to the folder where you want to create a drawing, and select the New button in the left navigation pane.
You’ll see a menu open. Select More at the bottom of this menu, and select Google Drawings from the submenu.
When you first open a new drawing using Google Drawings, the web app looks pretty basic and limited.
Don’t let this fool you. Google Drawings is brimming with useful features that’ll let you enhance professional presentations, develop diagrams to explain things to people, and even create cool graphics for your own website or infographics.
1. Create Diagrams and Custom Graphics
If you’re a blogger, a teacher, or even if you just use diagrams a lot in your professional job, Google Drawings is a lifesaver.
Google Drawings provides you with an entire palette of tools to create diagrams. These include arrows, lines, text boxes, various shapes, and a library of royalty-free images.
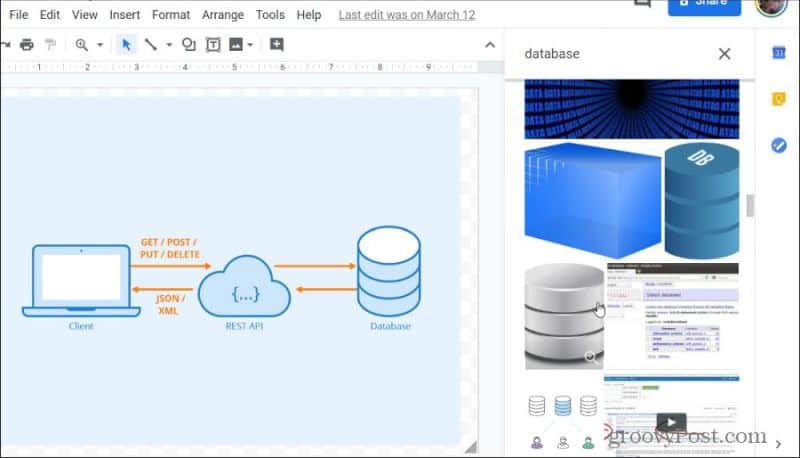
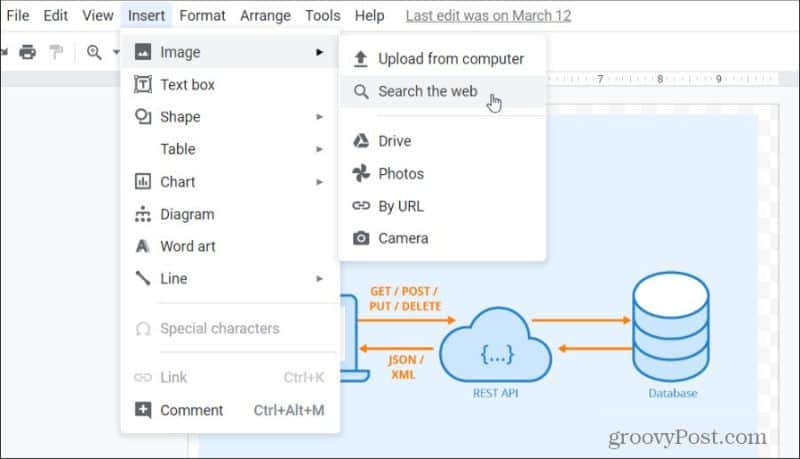
That’s correct, Google Drawings includes an entire library of images that you can use inside your own diagrams and images. You can access these by selecting the Insert menu, selecting Image, and then choosing Search the web.
Type the name of the image you’re looking for, and then just drag the image from the web library into your own drawing or diagram. You can insert multiple web images to build your own image or diagram.
When you’re done creating your masterpiece, you can download your new image in whatever format works best for you. To do this, select the File menu, select Download, and then choose the format you prefer.
For a blog or website, you might prefer JPEG or PNG. If you’re sending it to a work colleague as an informative diagram, you might consider downloading it as a PDF or SVG file.
2. Make Decision Flow Charts
Decision flow charts are used in a variety of industries, including programming, science, engineering, and even in business and finance. Organizations use flow charts to make important business decisions that affect entire companies.
The ability to create flow charts that can be modified and updated easily is important, and Google Drawings fits the bill.
You’ll find all standard flowchart decision shapes by selecting the shapes icon at the top of the drawing window. Select Shapes, and you’ll see the flowchart-specific shapes at the bottom of the window.
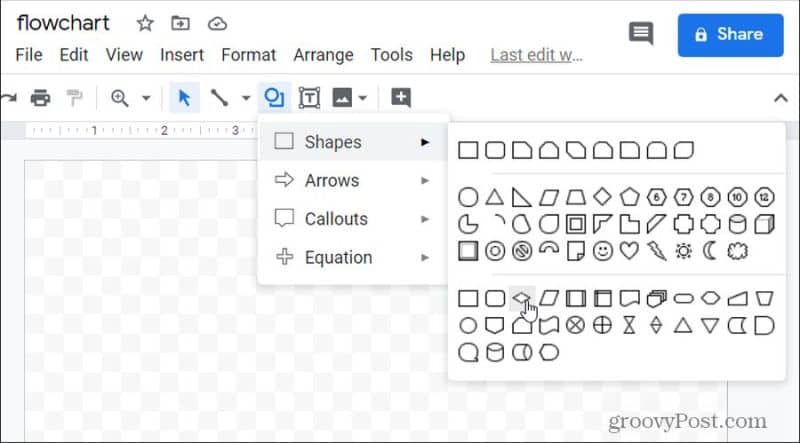
If you hover over any of the shapes, you’ll see a small pop-up telling you what part of the decision-tree that shape is for. This is helpful if you’re new to creating flowcharts.
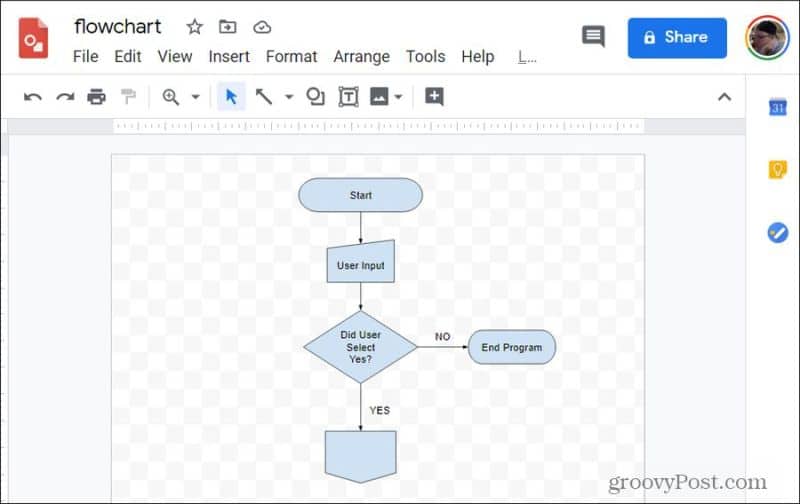
Creating a simple flowchart, like a programming flowchart, is surprisingly fast and simple.
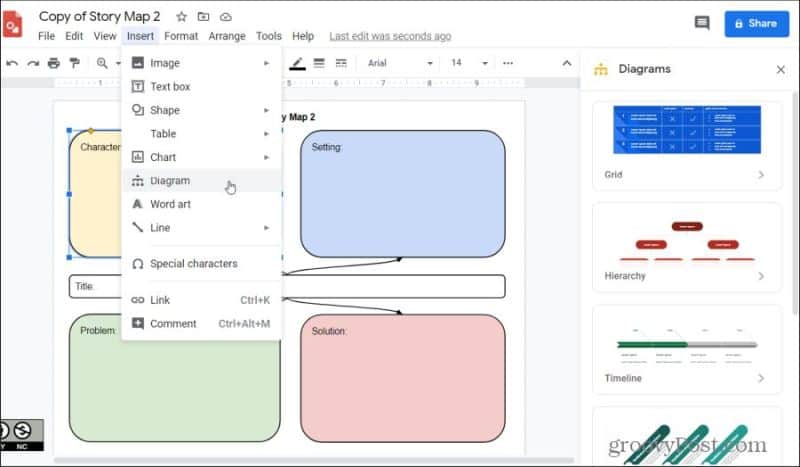
You also have a list of standard diagrams available that you can insert directly into your drawing.
Just select the Insert menu and select Diagram. This will bring up a list of diagram types to choose from. Choose a type and browse a sub-list with a variety of diagrams to choose from.
There are also a variety of Google Drawings templates available for a variety of other uses if you don’t want to start from scratch.
3. Create Interactive Graphics With Links
Another very creative way to use Google Drawings is to embed links into images. This is also known as adding “hotspots” to images. Google Drawings makes this very simple.
For example, if you’re a teacher and you’d like to create an image where students can click on each state and visit a Wikipedia page about that state, the process is very easy.
Using the procedure in the last section to insert images from the web, you can bring a map of the United States into Google Drawings.
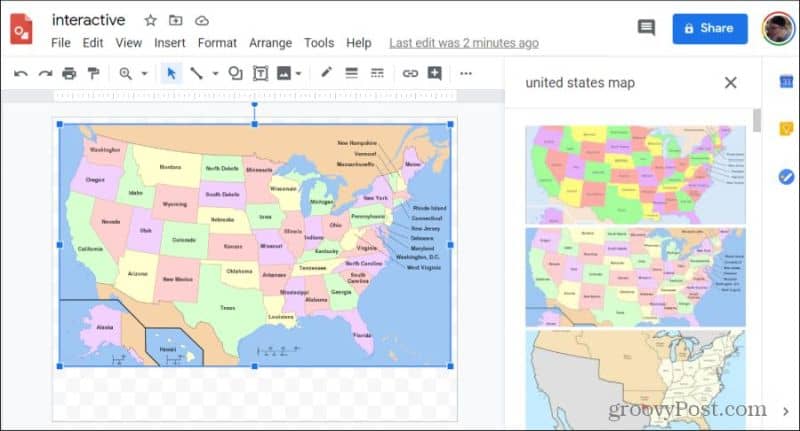
Use the shapes icon in the menu to draw any shape around the area of the image that you want to make into a URL link. Then, with that shape selected, choose the shape color and the text color and set them both to Transparent.
![]()
With the shape still selected, choose the link icon in the menu, and paste the URL that you want to use for that link in your image.
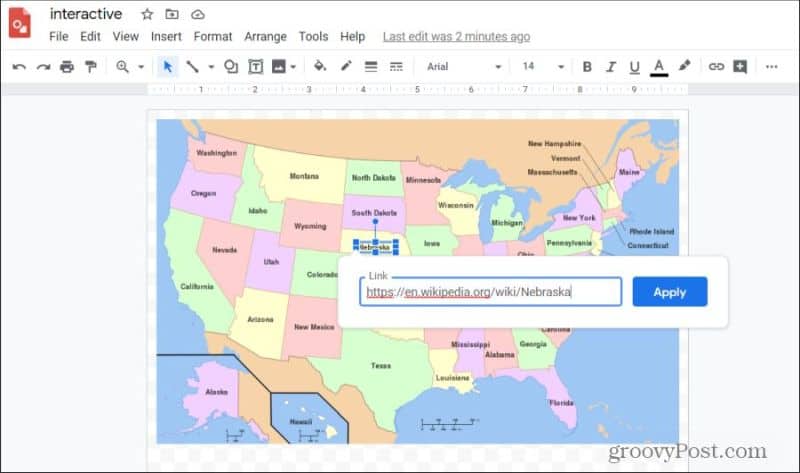
Select Apply, and now the area of the image covered up by your invisible shape will be clickable. You can repeat this process for every area in the image that you want to create into a clickable URL “hotspot”.
4. Make Funny Facebook Memes
Have you seen all of those funny images with captions applied on social media? Would you like to create one yourself? It’s fast and easy with Google Drawings, especially with the ability to bring in images from the web.
Follow the procedure in the first section of this article to bring any relevant image from the web into your Google Drawings canvas.

Next, place a call-out image onto the picture. Select the shapes icon from the menu, select Callouts, and choose from any of the callout boxes you want to use in your meme.
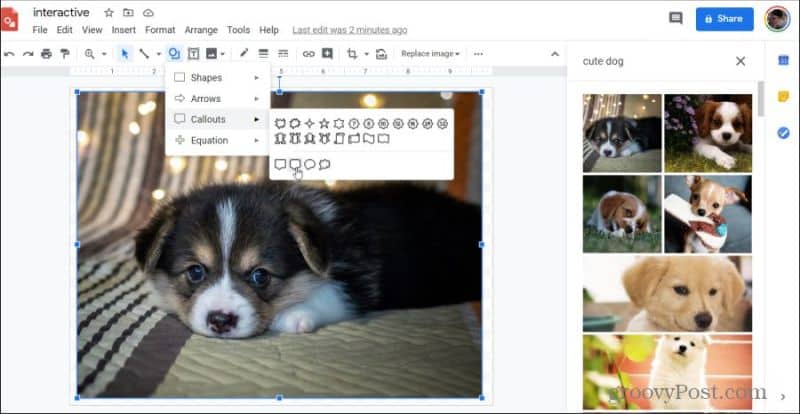
Adjust the border, fill color, and the text inside the callout box until you have it just right.
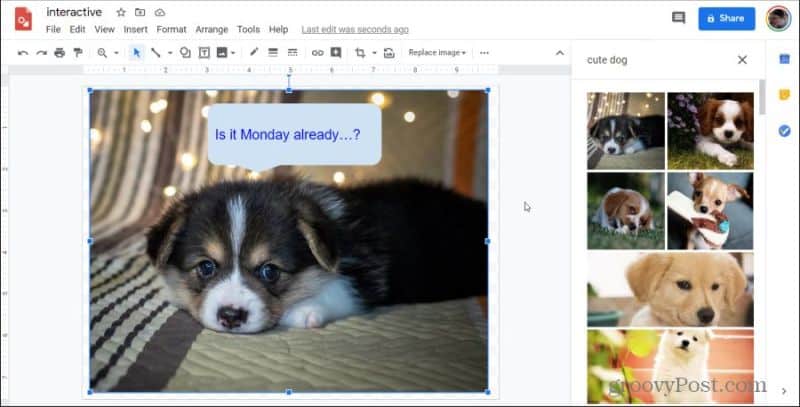
Now you can download this image as a PNG or JPG file and share it on Twitter or Facebook and make all your friends and family smile.
5. Create Organizers and Planners For Your Life
Google Drawings is the perfect tool for organizing ideas and planning strategies. It’s the best tool for all of these reasons:
- Works with your other Google services so you can incorporate email, Google Docs and Google Sheets, and more
- You can share and collaborate drawings to plan with others
- It includes all of the shapes and connectors you need to create organizers and planners
- You can hyperlink to external resources
- Share as a template so other people can use what you’ve developed
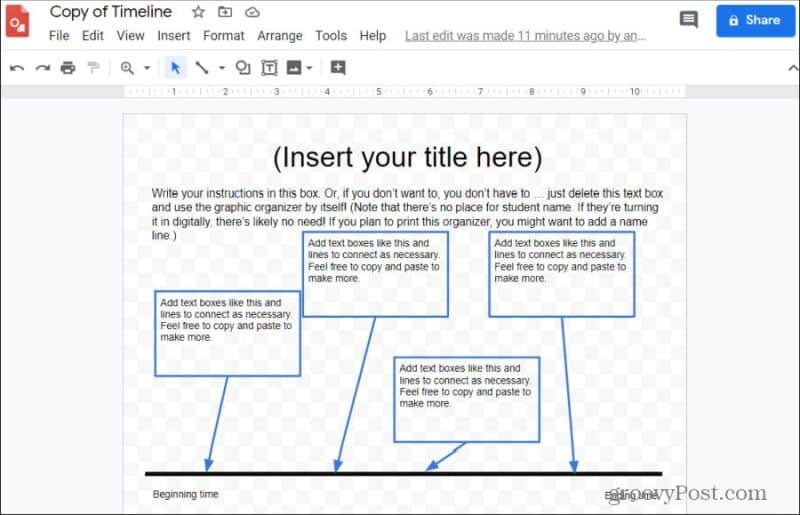
Using the same kind of shapes, lines, arrows, and other images available in Google Drawings, you can create all sorts of documents that help you organize. For example, the following timeline Google Drawings template from Ditch That Notebook lets you layout and organize events by date long a visual timeline.
You’ll find a list of 15 other free Google Drawing organizer templates at the Ditch That Textbook website.
The following templates are some other organizer Google Drawing templates to help you get started:
- Main idea and supporting details: Develop supporting evidence for your ideas
- 5 Senses diagram: Add to your journal for tracking sensory logs to your entries
- Mind Map template: Organize ideas through linked circles and lines that expand outward
- Bubble Map template: Similar to a mind map with a different coloring scheme
- Cause and Effect: Organize problem-solving and find the root cause.
6. Make Posters and Flyers
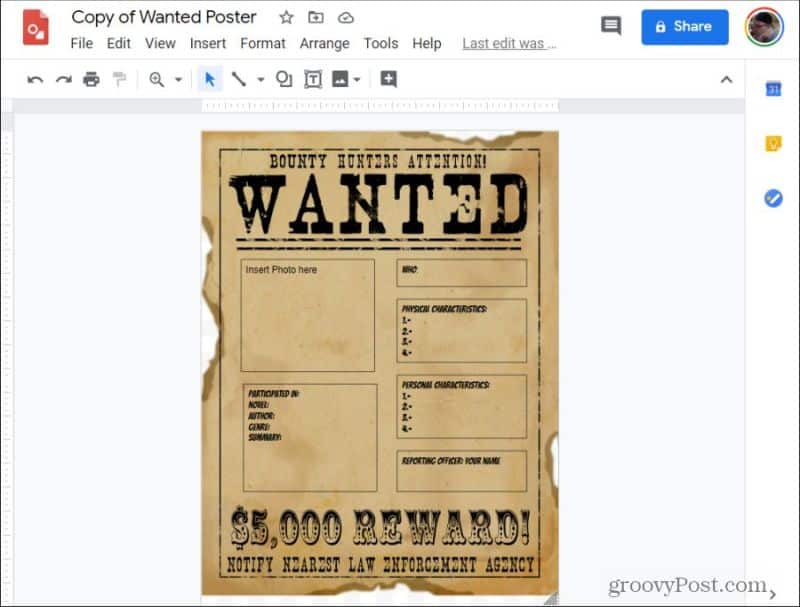
Google Drawings is one of the best free resources available online to create high-quality, professional-looking posters and flyers. If you don’t believe it, just look at this Wanted poster designed by the folks at Instruction Tech Talk.
The reason it’s so effective for this purpose is because of all of the features that Google Drawings has that you can use for this. These include:
- Creative background images you can get from the web
- Unique fonts
- The ability to resize and rotate fonts and images
- The flexibility to resize the canvas as large as you need a poster or flyer to be
- Use the zoom feature to create intricate designs and patterns
And of course, the ability to export the poster or flyer to a PDF or SVG file means you aren’t limited by the print size capability of your printer. Just take the file to a local Staples or Office Depot and print your poster or flyer there.
7. Embed Video Into Your Pictures
Here’s a great trick you can use to embed videos into your Google Drawing pictures, even though there’s no feature in Google Drawings to do that.
First, create a new Google Slides presentation and create a blank slideshow. Select the Insert menu and select Video.

Paste the link to the YouTube URL of the video you’d like to insert and select the video from the list. You’ll see the video appear in the slide. Right-click the video and select Copy.

Go back to your Google Drawings picture, right-click on the canvas, and select Paste.
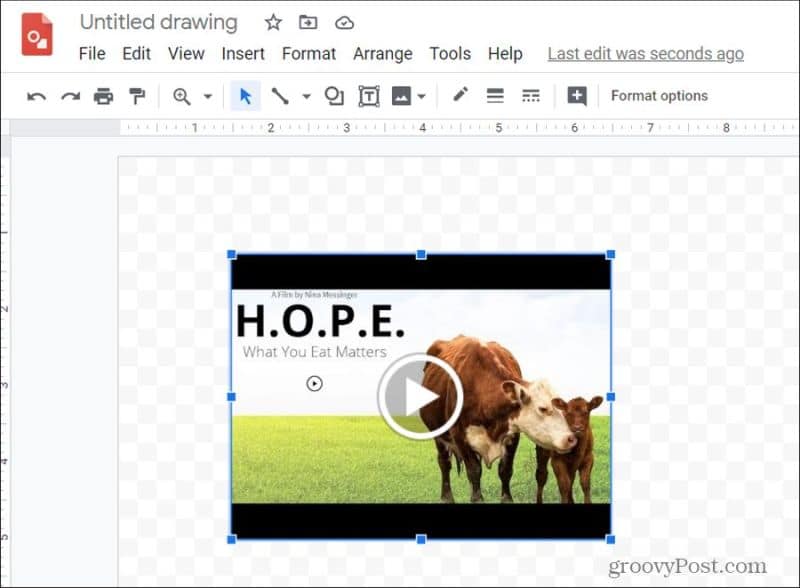
As you can see, now the video is embedded into your image. This trick lets you place actual videos inside any larger drawing that you create. Along with links and diagrams, the ability to embed videos gives you one more tool to create very useful and interactive graphics with Google Drawings.
8. Create Awesome Infographics
Thanks to the ability to extend the drawing canvas into any shape you like, Google Drawings is fantastic for building infographics.
The typical infographic is made up of multi-sized headers, text, boxes, and images. This means you have everything you need in Google Drawings to build these.
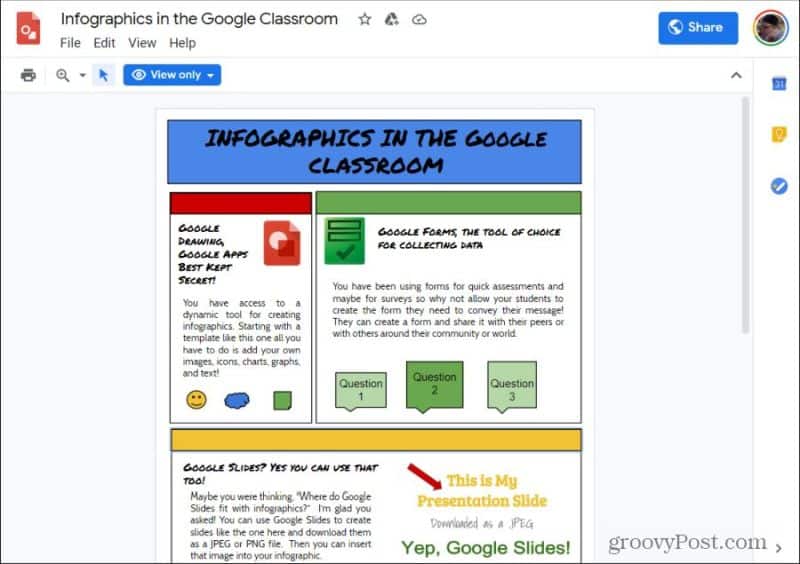
You can see a great example of this with the Infographics in the Google Classroom template. (To use this template, just select File > Make a copy.)
You can build infographics just like this one just using the tools available to you in Google Drawings.
9. Collaborate With Post-It Notes
Using post-it note images to organize thoughts and collaborate with colleagues makes a lot of sense in Google Drawings. This is because there’s a shape available tailor-made for the purpose.
To add post-it notes to your drawing, select the Insert menu, select Shape, and select Shapes. This will display the list where you’ll see the folded-corner post-it note shape. Select this to place it into your image.
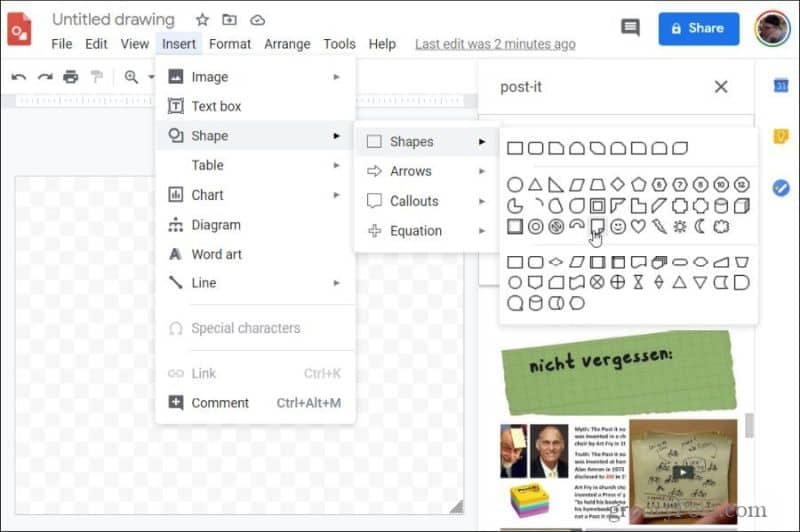
You can modify the color of each shape to simulate different colored post-it notes. Just copy and paste as many post-it notes as you need.
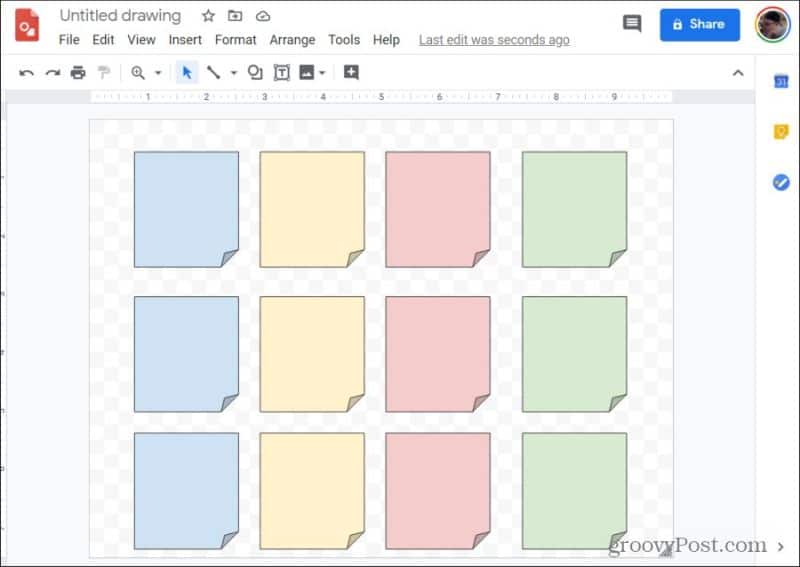
To add text to any of these, just click the shape and start typing.
10. Annotate Images
Google Drawings is also a great place to create a different sort of diagram. The annotated image. This is where you draw lines and add text to explain a concept to those viewing the image. Doing this in Google Drawings is extremely easy.

This is thanks to the text boxes and line drawing tools that are available. It also helps that there’s a large library of web-sourced images to draw from as well.
You Can Use Google Drawings for Anything
As you can see, Google Drawings isn’t just for making simple drawings. It serves lots of purposes. Depending on how creative you are, you can find lots of uses for Google Drawings both at work and at home.
How to Make a Flowchart in Google Docs
Students and business professionals everywhere use Google Docs to share their content and collaborate in real time. But text alone doesn't always adequately convey ideas or information.
Flowcharts and other visuals add interest to text-heavy documents and help readers understand your message quickly, so it's understandable why you'd want to add a flowchart into those documents.
Learn how to make a flowchart in Google Docs with these two options:
Both of these options are free to use, but after comparing the two, you will find that our flowchart maker offers the best value for quickly making professional diagrams that are always accessible and easy to share. See how these two approaches of making a flowchart in Google Docs stack up.
Option #1: Use Lucidchart to add flowcharts in Google Docs
Because Lucidchart is fully integrated with G Suite, you can easily insert diagrams you've already created in Lucidchart into your document. You can also use our free Google Docs add-on to start a brand-new flowchart—Lucidchart offers hundreds of templates that you can quickly customize from our intuitive user interface.
Before you make a flowchart in Google Docs manually, consider using the Lucidchart add-on to save you time and enjoy greater flexibility.
How to install the Lucidchart add-on for Google Docs
First you'll need to download the Lucidchart add-on for Google Docs if you haven't already. Simply follow these steps:
- Open a Google Doc.
- Select Add-ons > Get add-ons.
- Find and select Lucidchart.
- Give Lucidchart permission to access Google Docs.
- Log in to Lucidchart and give Google Docs permission to access your documents.
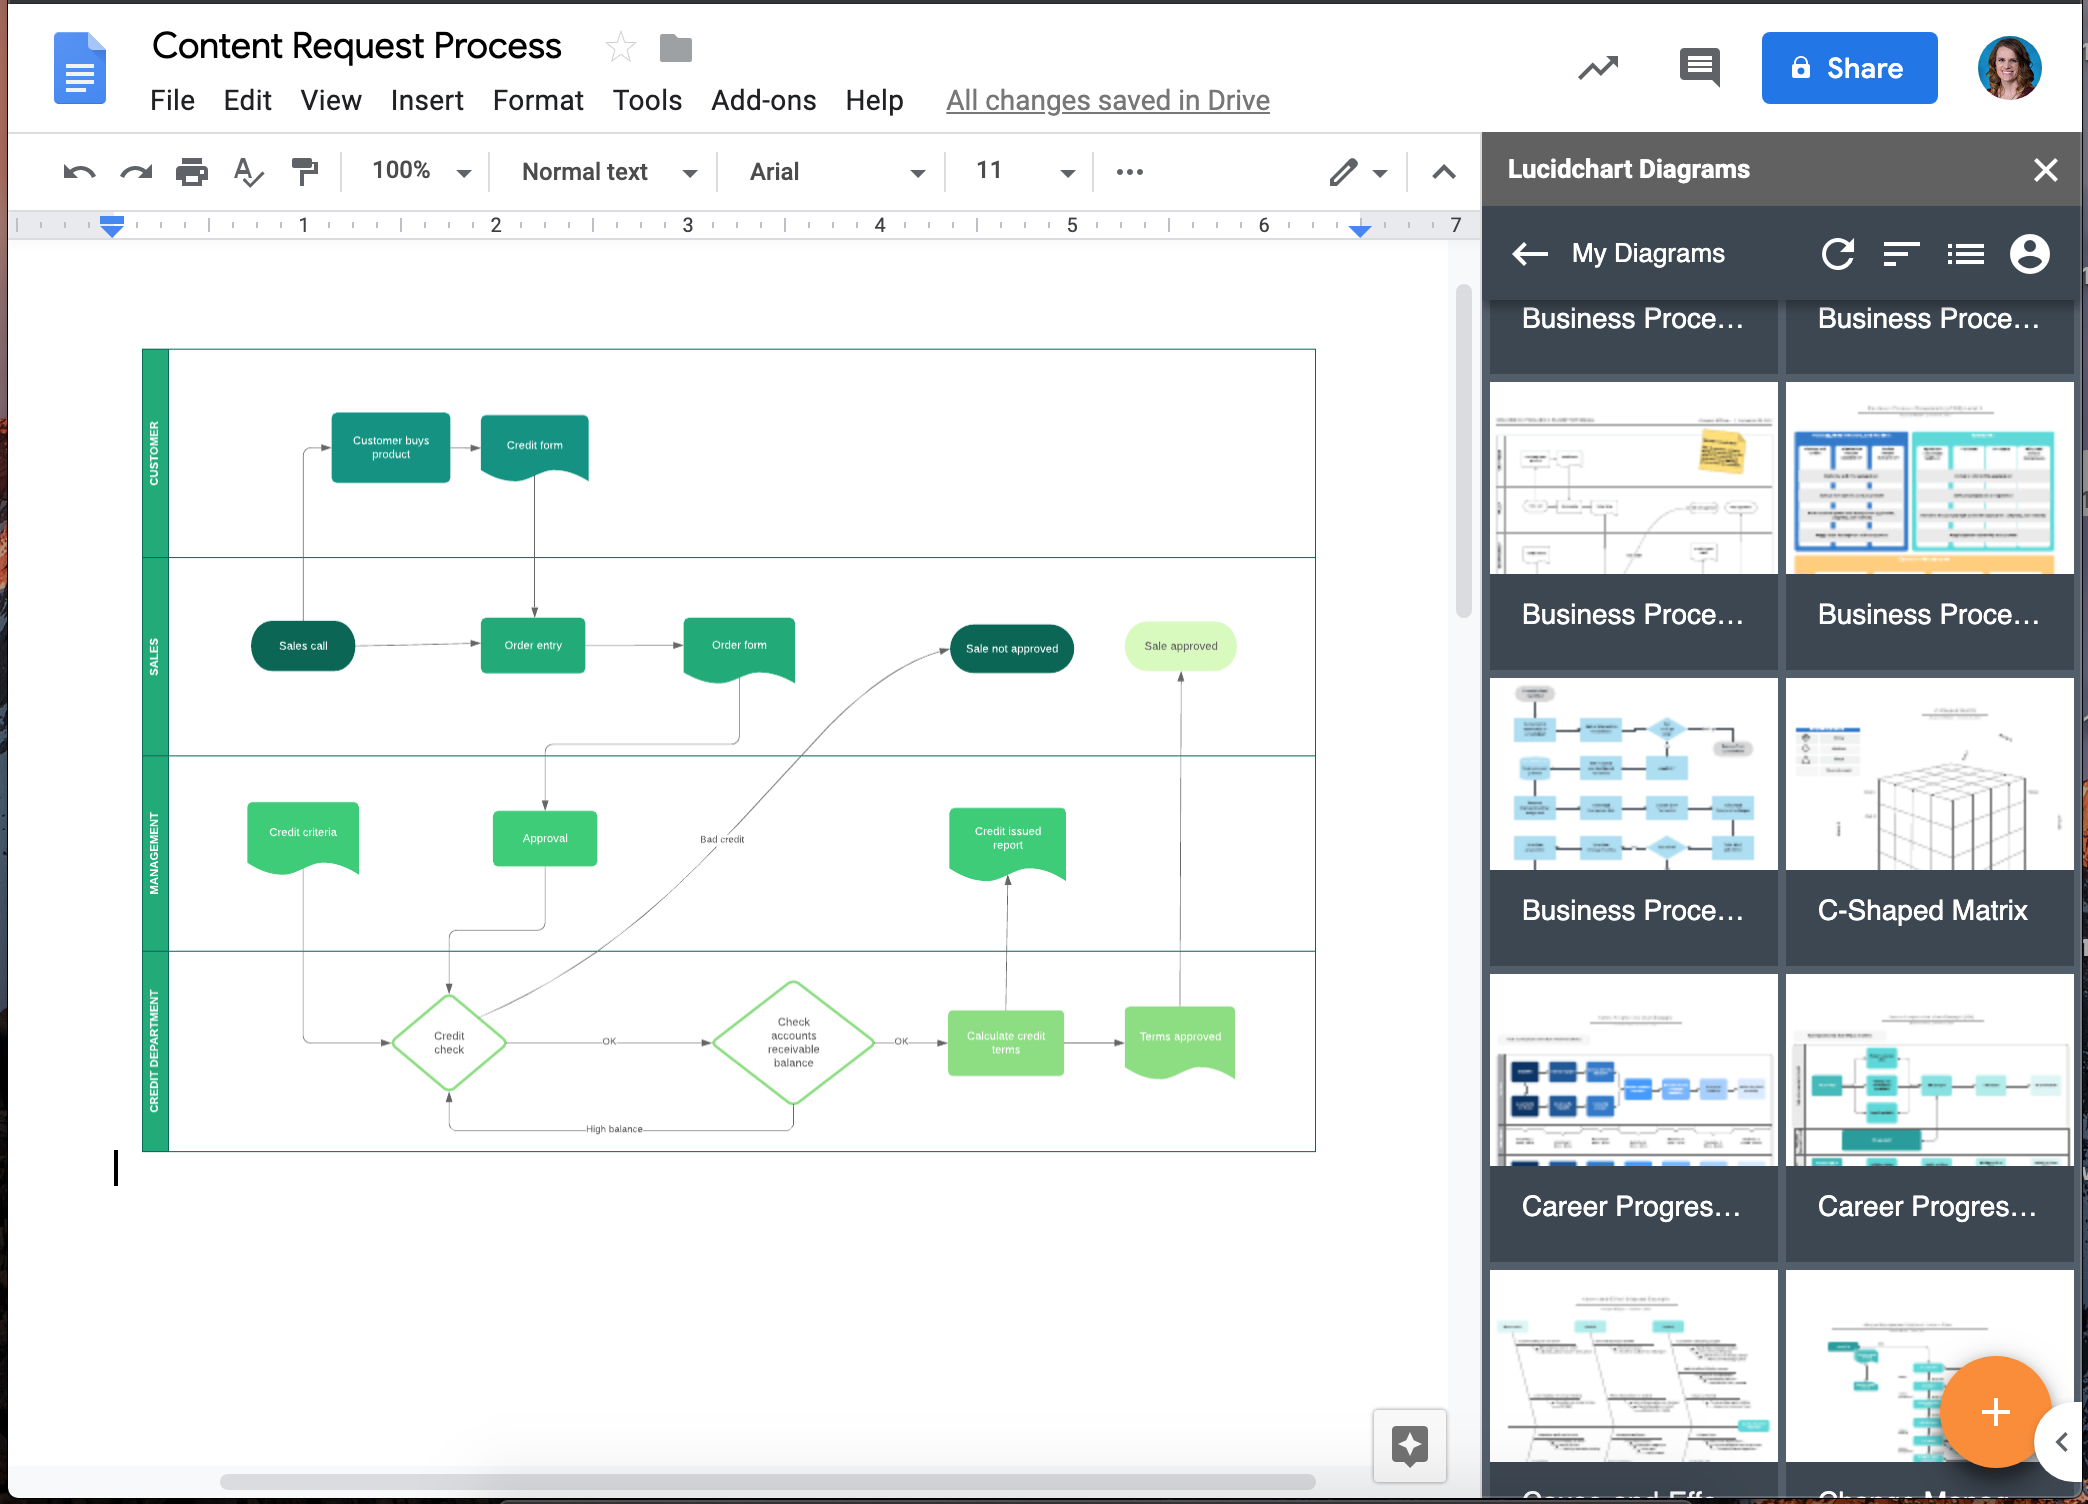
How to insert an existing flowchart into Google Docs with the add-on
With this add-on, you can insert your flowchart as a high-resolution image without leaving Google Docs.
- From your Google Doc, select Add-ons > Lucidchart Diagrams > Insert Diagram. A sidebar will appear.
- Choose your diagram from the list.
- Press "+." A preview will appear, and if you've chosen the correct diagram, click "Insert."
- If you edit your flowchart, select Add-ons > Lucidchart Diagrams > Update Inserted Diagrams to ensure that your flowchart is up to date and accurate.
How to create a new flowchart in Google Docs with the add-on
Haven't created your flowchart yet? No problem. Our Google Docs add-on will also give you instant access to the Lucidchart editor to create and edit diagrams.
- From your Google Doc, select Add-ons > Lucidchart Diagrams > Insert Diagram. A sidebar will appear.
- Click the orange "+" button at the bottom of the panel.
- Select a blank document or choose a template to customize.
- Drag and drop shapes and edit text to create your flowchart within the Lucidchart editor.
- When you're finished, return to your Google Doc, select your newly created flowchart in the sidebar, and press "+" to preview and insert your flowchart.
Need more help installing or using the Lucidchart add-on? Check out our Help Center or watch a brief video tutorial below.
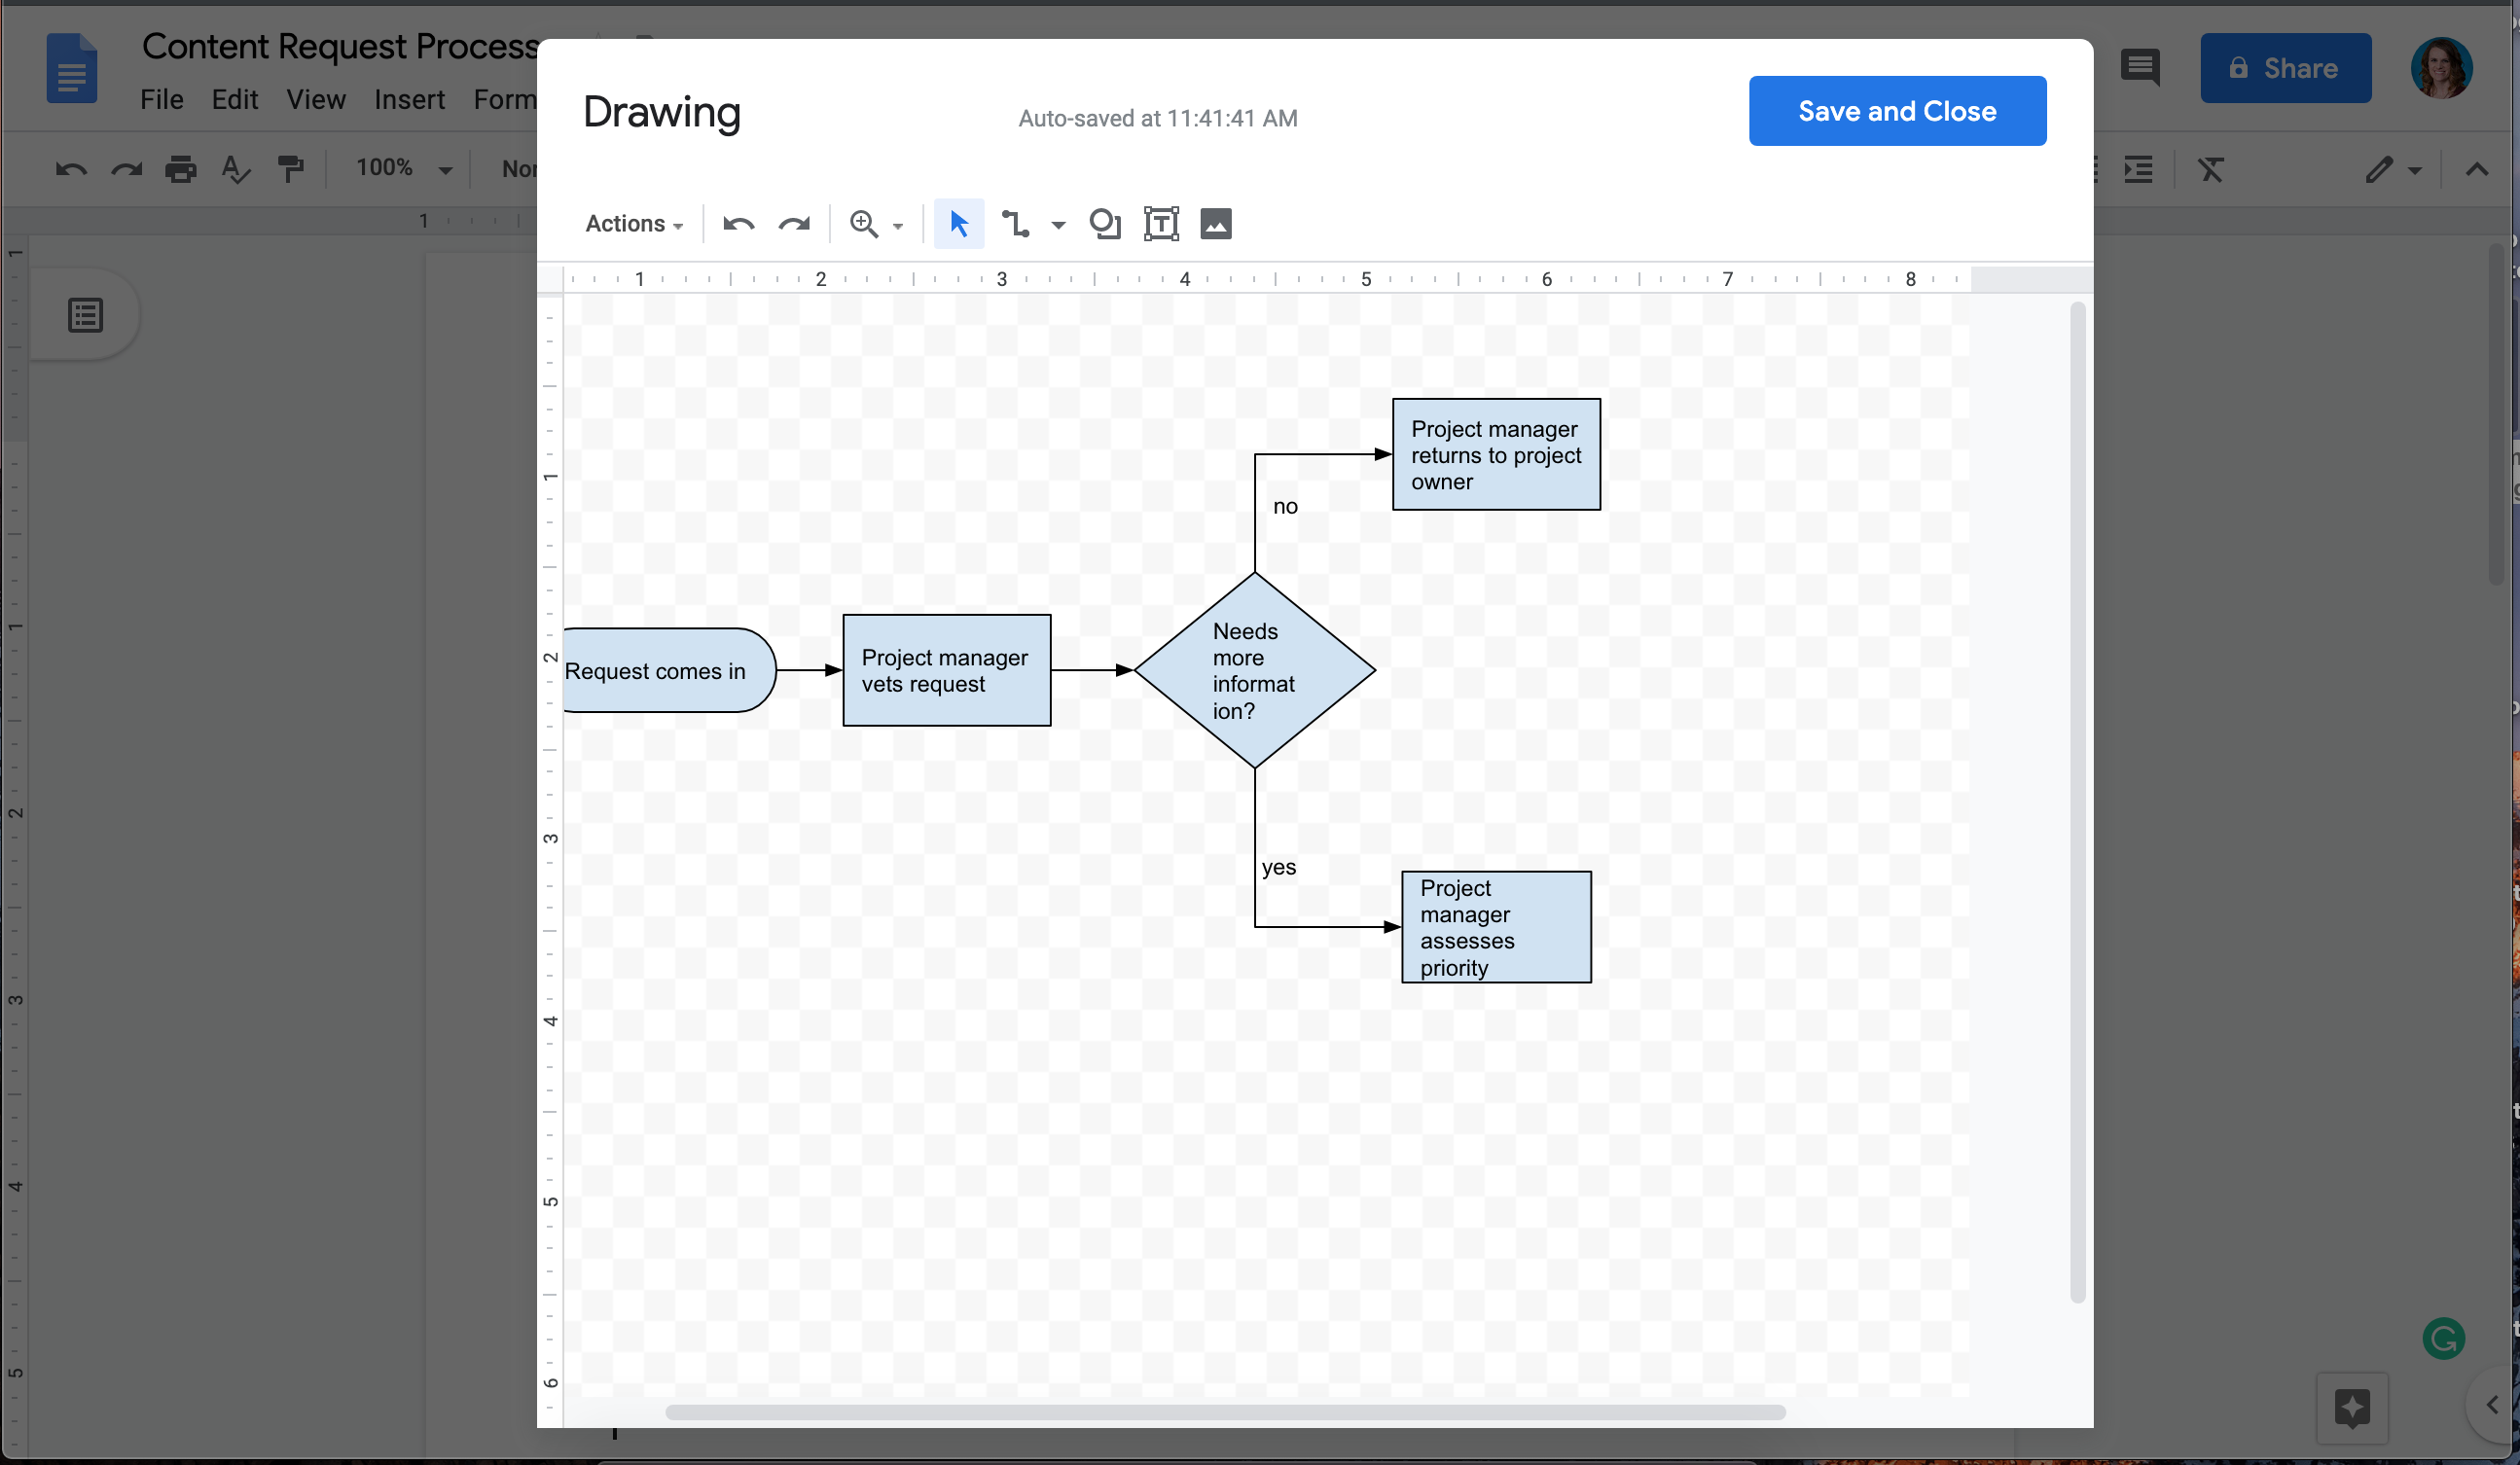
Option #2: Use Google Drawings to make a flowchart in Google Docs
Google Drawings is the native app for building flowcharts in Google Docs. It requires no setup but is difficult to use when you need to build large, professional diagrams. Follow these steps to get started:
- Open a Google Doc.
- Select Insert > Drawing > New.
- Use the shape icon to add shapes and the lines icon to connect them.
- When you're finished, click "Save and Close."
Now you can build a very simple flowchart that will appear in your Google Doc document with this manual approach, but Google Draw isn’t as intuitive or easy to use as Lucidchart. Since you won’t be able to refresh your diagram to show any updated changes, so you’ll need to take a little extra time to draw out, customize, and connect your shapes.
Why choose Lucidchart to create a flowchart in Google Docs
Although you can make a flowchart in Google Docs without installing an add-on, Lucidchart offers a number of distinct advantages over Google Drawings.
- Intuitive diagramming: In Google Drawings, every shape and line must be drawn individually, which takes more time and can leave your flowchart looking unpolished. Our visual workspace was built for better diagramming—drag and drop shapes and use auto-prompts and guides to build faster and keep shapes aligned.
- Hundreds of templates: Google Drawings requires you to start from scratch. In Lucidchart, you can browse through a full template library, including flowcharts for various use cases. Lucidchart also contains extensive shape libraries, so you can create mind maps, Venn diagrams, UML diagrams, and other visuals beyond flowcharts.
- Ability to share outside of Google Docs: When you create a flowchart using Google Drawings, it stays in Google Docs. With Lucidchart, you'll create a standalone document that you can share directly with collaborators or include within other popular apps, such as Slack, Confluence, Google Slides, and Google Sheets.
Now that you know how to make a flowchart in Google Docs with Lucidchart, give it a try! The software is free and provides the best diagramming experience on the market.

See how our flowchart software can
increase
productivity, accelerate
understanding, and drive innovation.
The Beginner's Guide to Google Slides: Content Types
The Google Slides content types range from simple text to videos and sound. There are a lot of ways you can combine the different forms of content to express yourself and tell an engaging story.
Let’s show you how the different types of written and visual content in Google Slides works and how you can get started if you’re a beginner with this tool.
1. Types of Content in Google Slides
Content can be either text or images, charts, tables, simple shapes or even audio and video files.
Each element can be animated, so that in presentation mode, the information can come in little chunks or in a more attractive way.
Animations between the slides are called Transitions.
Text

You have number of fonts to use by default and a lot you can add. Click the font menu and choose the option More fonts at the top of the list.
All the fonts you can choose from are part of the big Google Fonts library. It’s a totally free resource for high quality fonts. Using one of them will guarantee, that everybody who opens your presentation through the link can see it in its original design.
To add a new textbox, simply click on the icon with T in frame, which is on the tool bar.
Clicking with right mouse button on a text box, you can choose Format options and a panel with more editing possibilities will open on the right.
Images
The next icon on the right is for adding images.
Different choices will appear. As this is an online software, you can upload a picture from your computer or even camera, but also to import directly from the web through Google Search, URL or your Google Drive.
However, we recommend you to avoid using pictures directly from the web because sometimes the images are not available any more. The best way is to download the selected image first and then upload it from your local drive.
Clicking with right mouse button on an image, you can choose Format options and a panel with more editing possibilities will open.
The Five Interactive Question Types
Overview
This article focuses on how to create custom interactive slides with each of the five Pear Deck Interactive Slide types. Before you begin, create a Pear Deck account and get the Pear Deck for Google Slides Add-on or PowerPoint Online Add-in. Then, customize your lessons in Google Slides or PowerPoint Online.
Create an Interactive Slide
First, use the editing tools in Google Slides or PowerPoint Online to put a question, prompt, equation, list, image, etc. on your slide. Then, use Pear Deck to determine how students will respond on the Student View. When you present and students join your Session, they see the slide and are able to respond on the Student View according to the interactive response type.
- Response layout guide
- Draggable™
- Drawing
- Text
- Number
- Multiple Choice
- Website. You can embed a website for students to explore on their screens. It's interactive, but it doesn't allow students to insert a response like the types listed above. Click here to learn about Website Slides .
.png?width=56&name=Peary_Normal%20(Forward).png) Pear
Deck Interactive Slides help encourage creativity and critical thinking. When
you ask a question with Pear Deck, each student answers on their own screen.
These answers are automatically saved in your Sessions, so you can display them
in real time on the Projector View during class and see students' names with
their responses in the Teacher Dashboard.
Pear
Deck Interactive Slides help encourage creativity and critical thinking. When
you ask a question with Pear Deck, each student answers on their own screen.
These answers are automatically saved in your Sessions, so you can display them
in real time on the Projector View during class and see students' names with
their responses in the Teacher Dashboard.
Response layout guide
In this article, you can see how all of the interactive
response display on the Projector and Dashboard Views of a Pear Deck Session. To
collect and see responses, click the Start Lesson button to start a new
Session, then have students join. Click the Show responses button on
the Navigation bar. You can change then change the response layout in the top
left corner of the screen: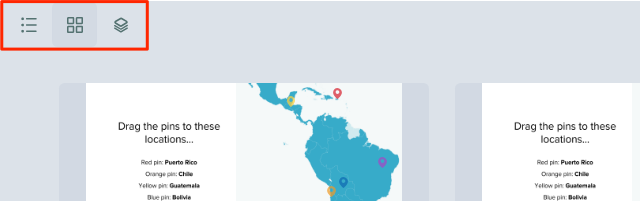
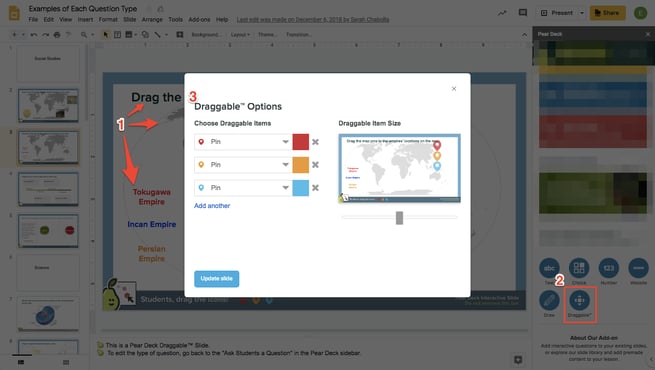
Draggable™ Response
Students respond by dragging objects over the slide in an Instructor or Student-Paced presentation Session. For example, you can have them drag pins over a map.
- Put your question, instructions, and/or image(s) on the slide.
- Open the Pear Deck for Google Slides Add-on or PowerPoint Online Add-in. In the sidebar, scroll down to the Ask Students a Question section. Click on Draggable™.
- In the pop up menu, use the drop-down arrows to select the icons you want
(up to 5). Click on the color boxes to change the colors and drag the slider to
adjust the size. When you're finished, click Update slide.
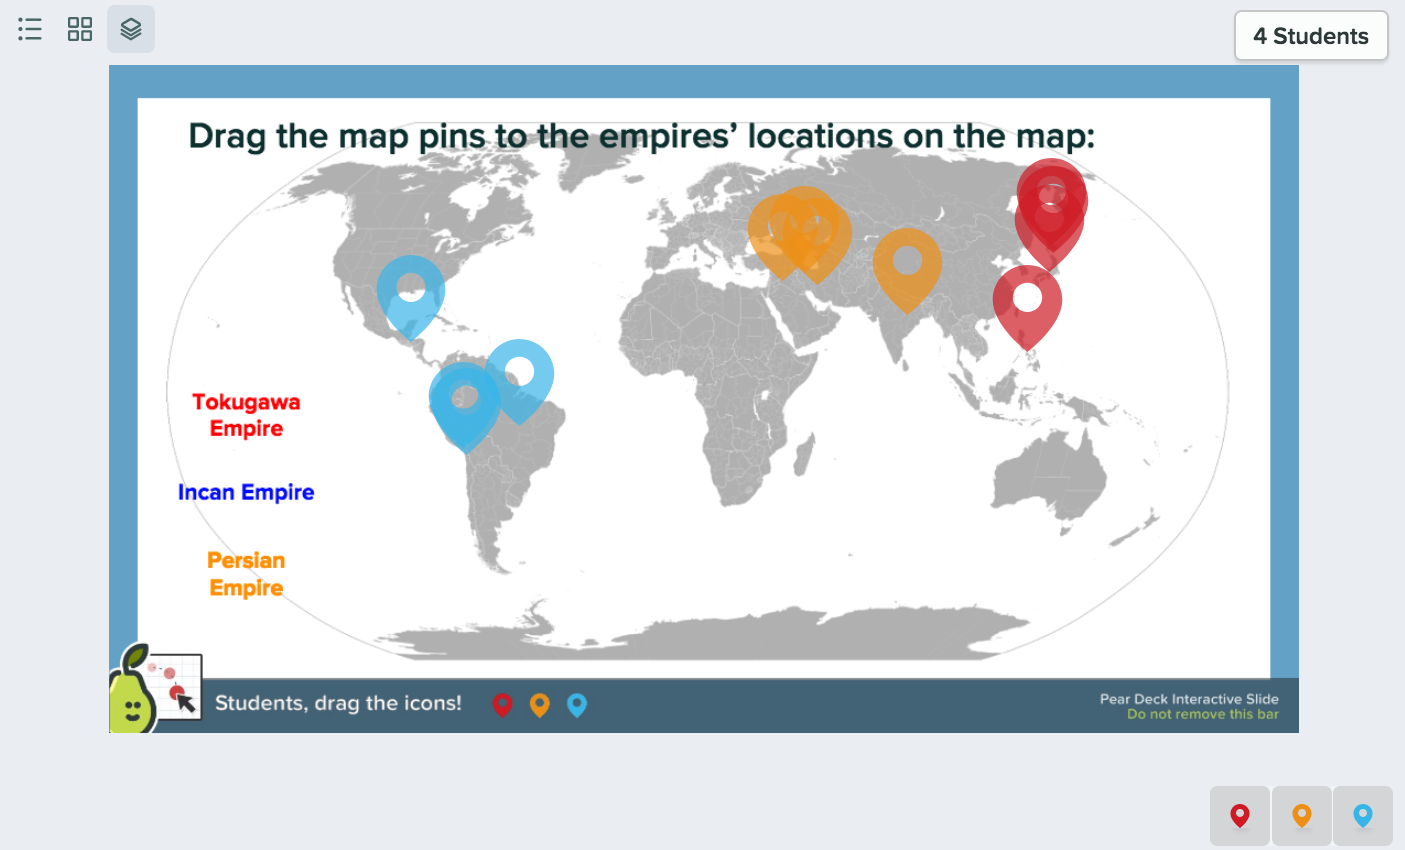
During your presentation Session
Click Start Lesson to present a Session and have students join. When you reach a Draggable slide and click Show responses, the default display is the Overlaid Layout. But you can also display responses individually by clicking the List or Grid buttons in the top left corner of the screen. Responses are always anonymous on the Projector View.
- The Overlaid Layout shows all responses at once:
- The Grid Layout shows thumbnails of the responses
.png?width=655&name=Draggable,%20map,%20grid%20on%20projector%20(2).png)
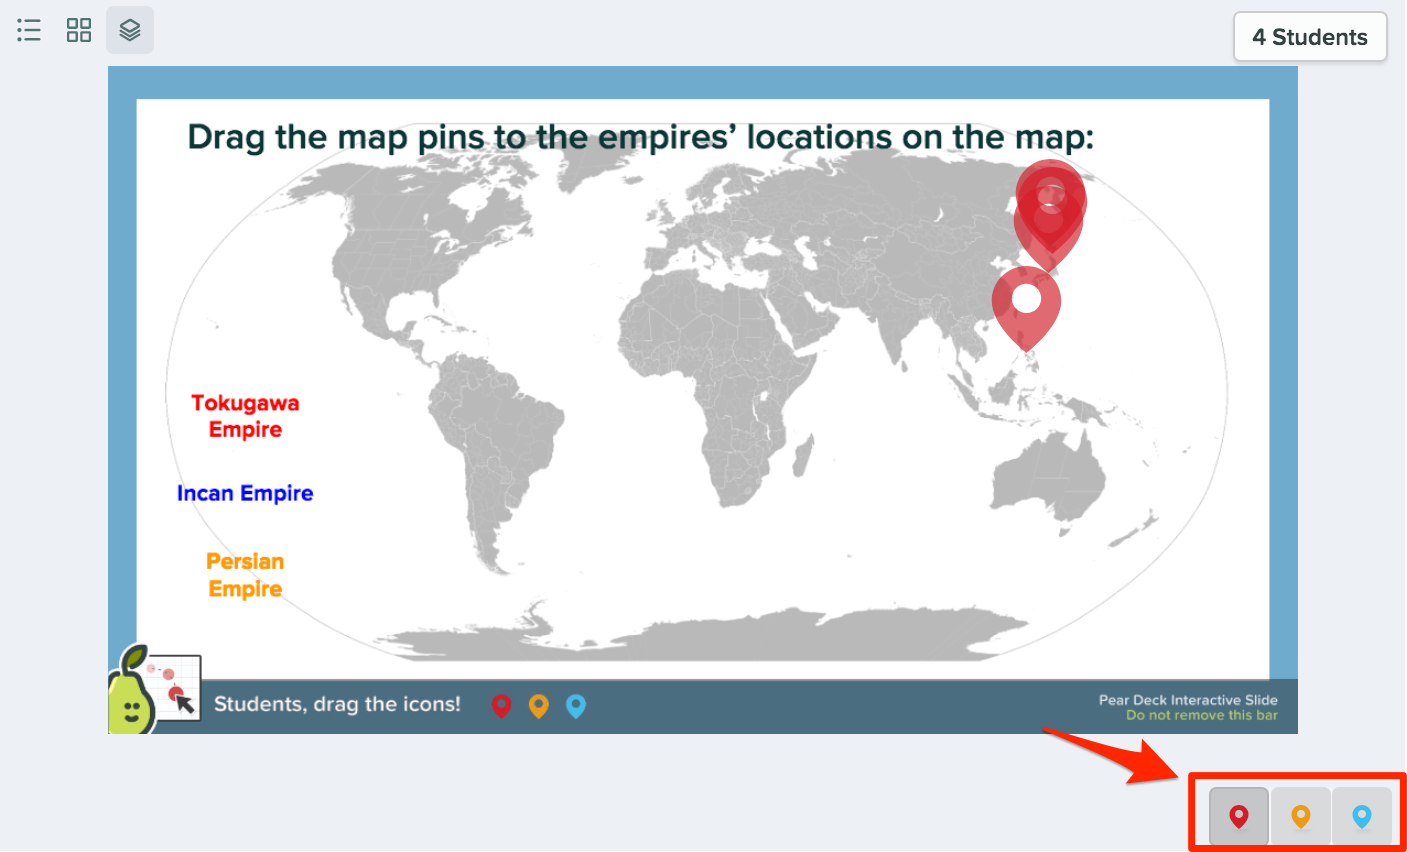
- In the Teacher Dashboard, you can also select which type of icon you want to
show on the projector. In this example, only the red pins have been
selected:
Drawing Response
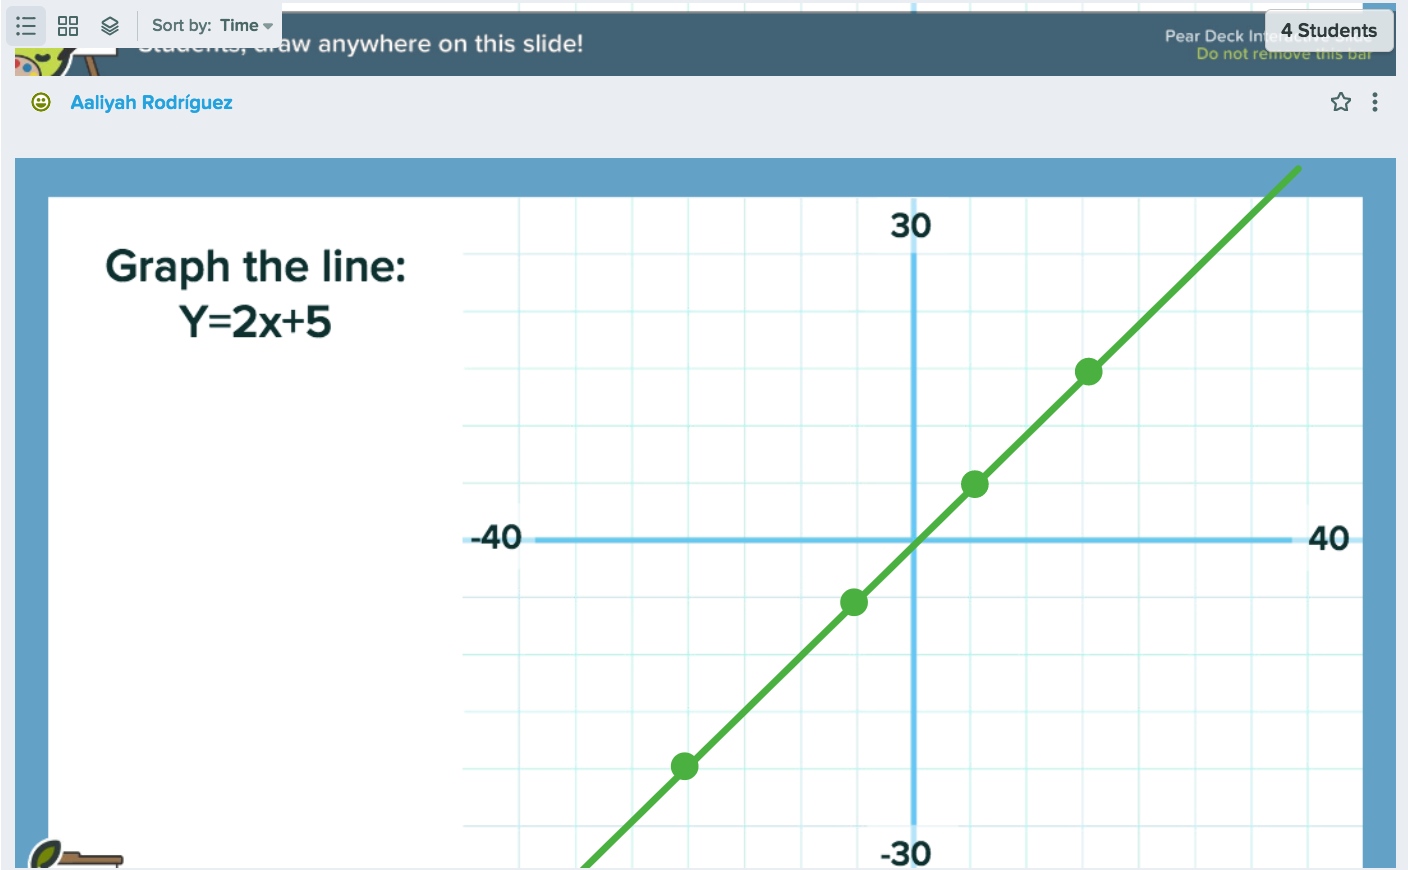
Students respond by drawing over the slide in an Instructor or Student-Paced presentation Session. For example, they can graph a line.
- Put your question, instructions, and/or image(s) directly onto your slide.
- Open the Pear Deck for Google Slides Add-on or PowerPoint Online Add-in. In
the sidebar, scroll down to the Ask Students a Question section. Click
on Draw.

During your presentation Session
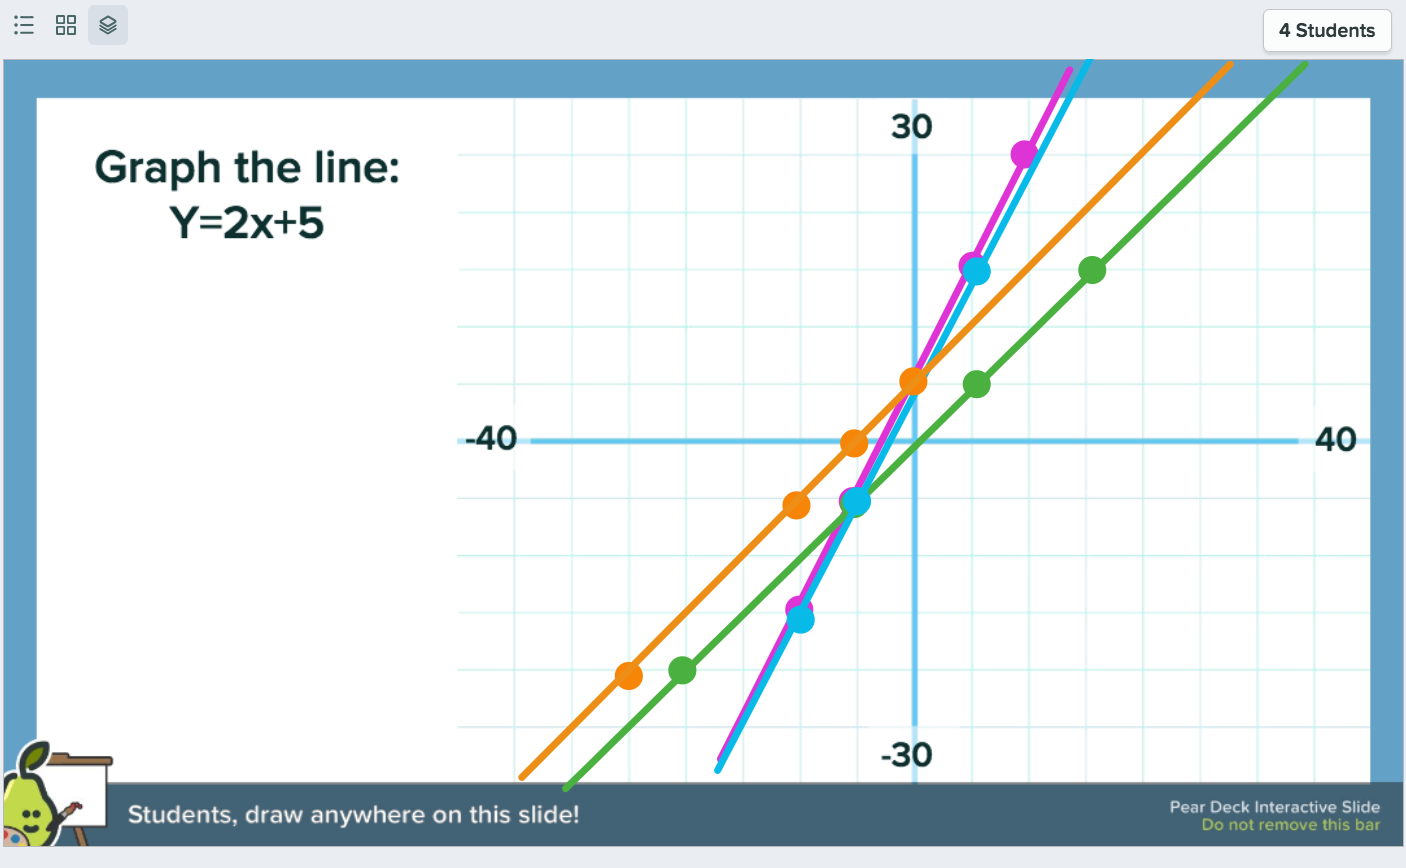
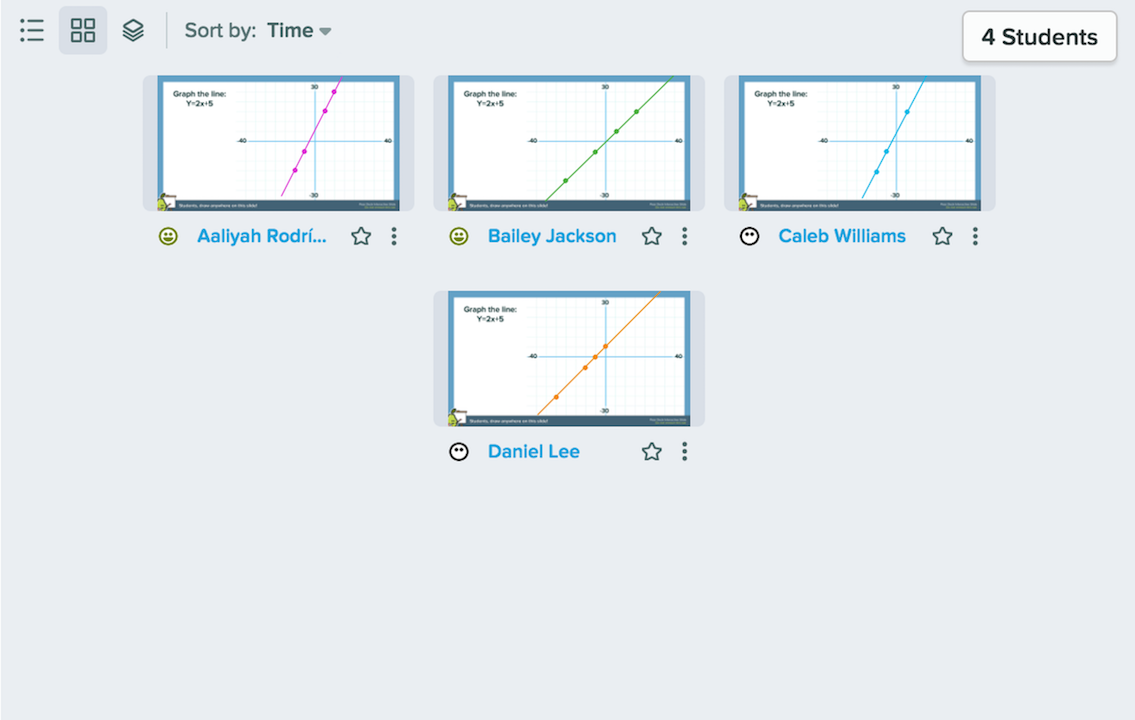
Click Start Lesson to present a Session and have students join. When you reach a Drawing slide and click Show responses, you can click on List or Grid in the top left corner to display each student's answer individually, or click on Overlaid to display all of the answers on the same background.
- The List Layout, as seen in the private Dashboard View, where you can see
also students' names
- The Overlaid Layout
- The Grid View
Free Response: Text
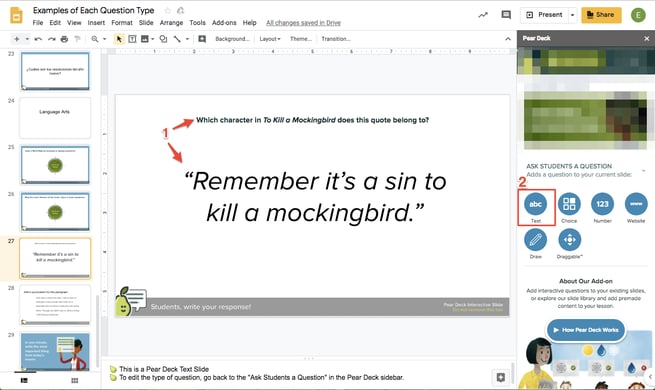
Students respond by typing text. For example, you could ask which character from To Kill a Mockingbird this quote belongs to.
- Put your question, instructions, and/or image(s) directly onto your slide.
- Open the Pear Deck for Google Slides Add-on or PowerPoint Online Add-in. In
the sidebar, scroll down to the Ask Students a Question section. Click
on the Text option. That's it!
During your presentation Session
Click Start Lesson to present a Session and have students join. When you reach a Text response slide and click Show responses, students can type into a text field on the Student View. Go to the top left corner of the screen and click on the List Layout or Grid Layout.
- List Layout
.png?width=655&name=Text,%20list,%20on%20projector%20(2).png)
- Grid Layout

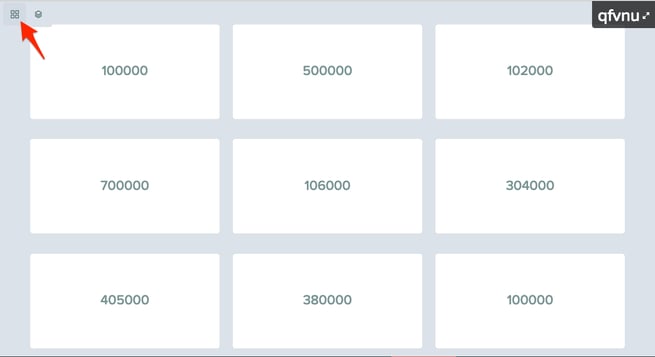
Free Response: Number
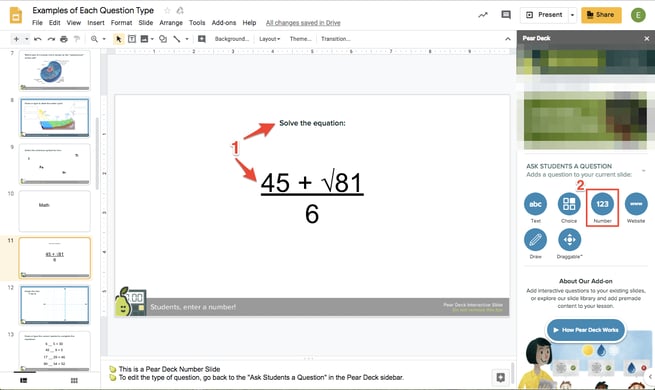
Students respond by typing in a number. For example, students can solve an equation and leave a number response.
- Put your question, example, or equation directly on the slide.
- Open the Pear Deck for Google Slides Add-on or the PowerPoint Online Add-in.
In the sidebar, scroll down to the Ask Students a Question section. Click on the
Number option. Voila!
During your presentation Session
Click Start Lesson to present a Session and have students join. When they reach a Number response slide, students can type a number into the Student View. When you click Show responses, you can display answers in two ways on the Projector View. One option is the Grid Layout, which shows all of the individual numbers students entered. The second (and default) display is a Box and Whisker Plot. The grey dotted line goes shows the median answer, and a grey box surrounds half of the answers. You see the range and where the majority of answers fall. The thin black lines demarcate high and low answers. If there are extreme outliers, use the magnifier tool to zoom in and leave the outliers, out.
- Grid Layout
- Overlaid Layout (Box and Whisker Plot)

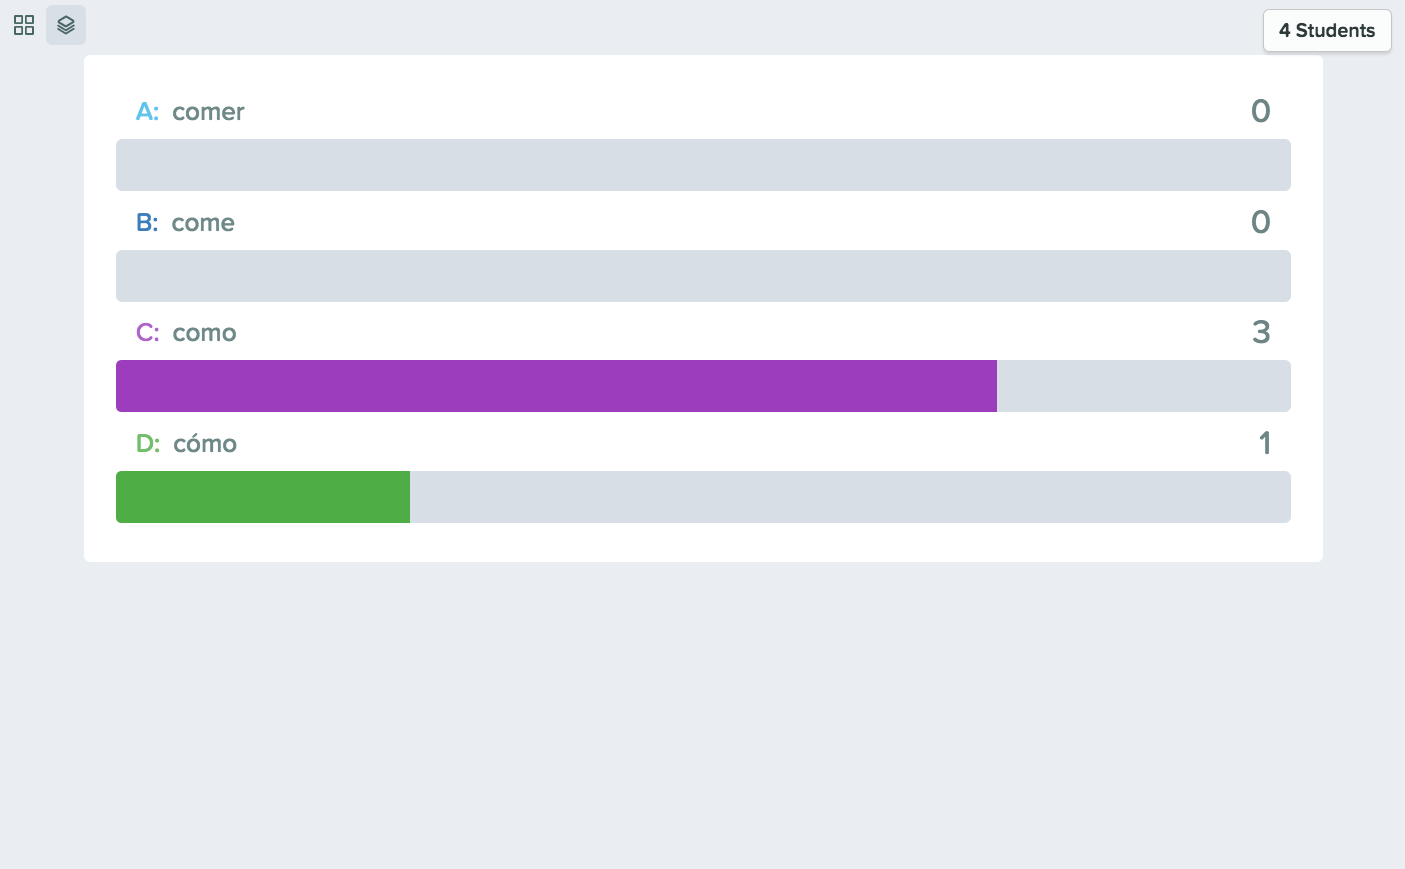
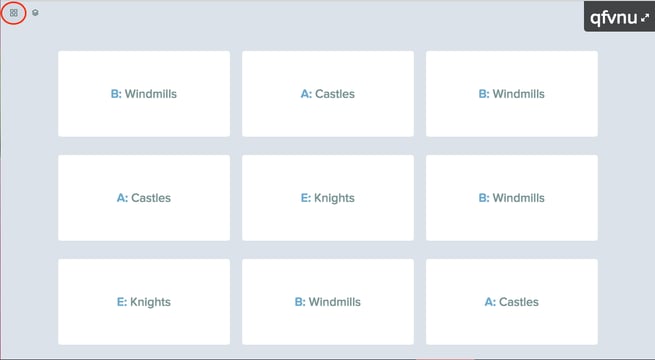
Multiple Choice
Students respond by selecting one of your predefined answers. Depending on the question, it can be a great idea to supply multiple defensible answers to make the question more challenging and spark discussion. For example, students can fill in the blank with the correct use of the word comer.
 Please
note that there is not a way to for you to set or indicate a correct answer on
the Multiple Choice slide! However, you may give students private feedback from
the Dashboard (with Premium) or export responses to a Google Sheet and grade
from there.
Please
note that there is not a way to for you to set or indicate a correct answer on
the Multiple Choice slide! However, you may give students private feedback from
the Dashboard (with Premium) or export responses to a Google Sheet and grade
from there.
- Put your question, instructions, and/or image(s) directly onto your slide.
- Open the Pear Deck for Google Slides Add-on or the PowerPoint Online Add-in.
In the sidebar, scroll down to the Ask Students a Question section.
Click on the Choice button.

During your presentation Session
Click Start Lesson to present a Session and have students join. When you click Show responses, the anonymous aggregate display on the Projector View shows the tallies. You can also display each choice individually by clicking on the Grid View.
- Overlaid Layout (tally)
- Grid View
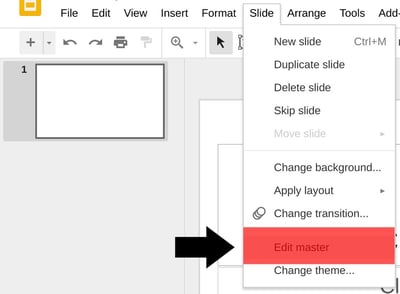
1. Create a Master slide
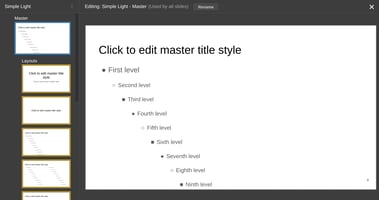
If you are working on a slide with several people then you are bound to have people using their own colors / fonts / themes. With Google’s Master slide feature, you can design one style that stays consistent throughout the presentation to make sure your presentation stays uniformed. To use this feature, click on “Slide” from the top menu, and then click “Edit master.”
You will now see a master layout; any style you put in the first slide will repeat in any additional slides. You can also add images (such as logos) to this slide, so you don’t have to insert them into each slide.
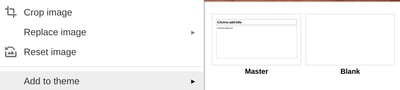
2. Add a theme to Master slide
Another way to change the Master slide is to go to any text or image in any of your slides, and right-click, then select “Add to them” and click “Master.” This will apply the style of the text or the placement of the image to every slide in the document.
3. Create a Template to Share
Once you have a Master slide, you can use your
presentation to share with others in your organization. To add it as a shared
template, go to your Google Drive and select the arrow to the right of Google
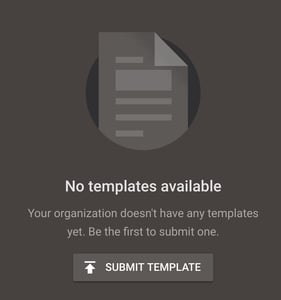
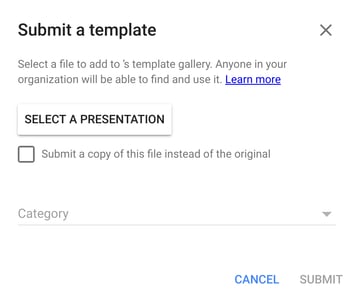
Slides, then select “From a template.”
From here, select “Submit template.”
Finally, go through your presentations and add the one you want to submit.
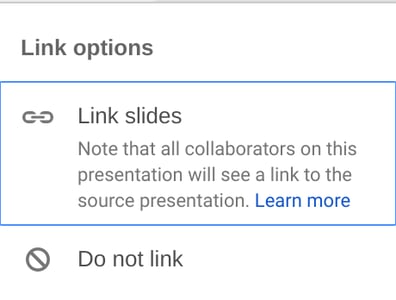
4. Linked Slides
You probably already know you can copy and paste entire slides; a commonly overlooked feature is linking slides from another presentation; copying and pasting a slide from another presentation is helpful, but if that slide gets changed, it’s not updated in your presentation. Linking the slide ensures that any changes carry over to your presentation. To take advantage of this feature, do copy and paste as you normally would, but when you paste the slide, select “Link slides” from the option box that comes up.
5. Import Slides
Importing a PowerPoint presentation to Slides is easy. Select “File” and “Import slides,” and then click the “Upload” tab.

6. Import Keynote
Importing slides is great if you have PowerPoint, but how do you import Keynote or other presentation software? The easiest way is to save your Keynote presentation as a PowerPoint presentation, and then import that presentation.
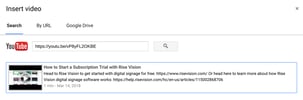
7. Insert videos
You can insert YouTube videos and video files right into your Presentation. If you’re doing a live stream on your digital signage, then this is a feature you definitely want to take advantage of. To add a video, go to “Insert” in the top menu and “Video.”
8. Trim a video length
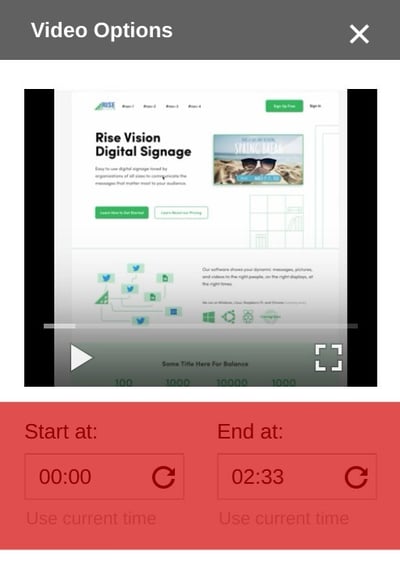
Slides is not a video editing suite by any stretch, but there is one very useful feature for editing a video: trimming a video’s length. This can be helpful if a colleague gives you a ten-minute video, but there’s just a short clip that you want to use in your presentation. To edit a videos link, right-click the video thumbnail image, and select “Video options.”
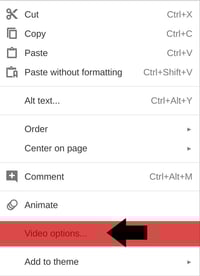
From here, a new menu will come up with a few options. To trim the video, add the start and end time that you want to use, and then close the box. There is no Save button; it’s automatically saved.
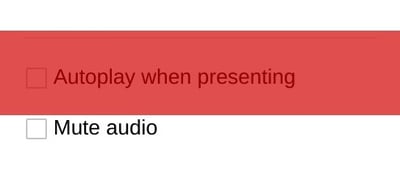
9. Autoplay videos
Trimming a video is great, but if you are using Slides for your digital signage, then you’ll want to be able to start a video automatically. To do this, follow the same steps above (right-click the video, select “Video options”); when the menu appears, select “Autoplay when presenting.”
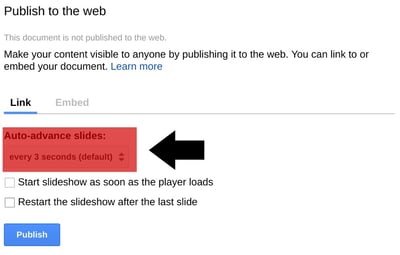
10. Autoplay slide
Having a video play automatically is useful, but if you are using Slides for digital signage, then you’ll need the slides to automatically advance as well. This is easy to do. When you publish your presentation to the web (from the top menu “File” and “Publish to the web”), there’s an option to Auto-advance slides; change it to your desired time right before you publish the presentation (hint: you can change this later).
11. Host a Q&A
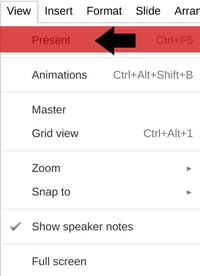
From Present mode, select the “Q & A” button; if this menu is hidden, just move your mouse.

Next, click the “Start new” button; if you are returning to the Q&A after you’ve turned it on, this button will change to “Continue.”
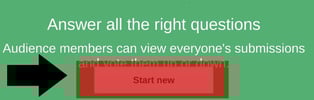
The link for the Q&A will appear; copy that so you can display it on your presentation later. If you no longer want to accept questions, just toggle On to Off.
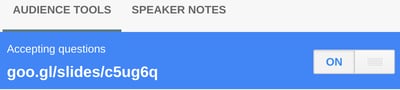
When a user goes to the Q&A, it will look like the below (tip: this is unmoderated; this means there is nothing to stop someone from anonymously posting whatever they want; if this is a feature you want to use, you’ll want to police it often).

12. Link Google Sheets
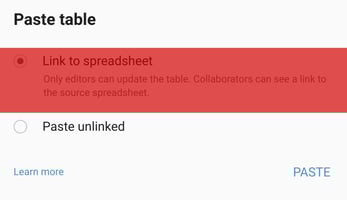
Just as you can link to other Presentations, you can also link to other Google Sheets. This is a powerful feature if you are displaying Charts or Tables on your digital signage that are regularly updated with new content. Pasting in a Sheet is similar to pasting in a slide. right-click on the slide and select “Paste” then in the option menu, select “Link to spreadsheet.”
To link to a chart, go to the top menu and select Insert > Chart > From sheets.

13. Use drop shadow / reflection
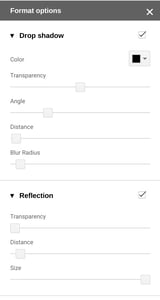
Using bold is an easy way to make text stand out in a document, but if you want it to stand out in a Presentation, then drop shadow or adding a reflection is often a better solution. To add this formatting, go to the formatting bar; at the far right side of this bar, there is three dots (which represents more options); click those three dots, and then from the new menu, select “Format options.”

This will bring up a formatting box; drop shadow and reflection are both options; clicking the arrow to the left side of them will expand the options. After you make your select, you do not need to save. Save is automatic.
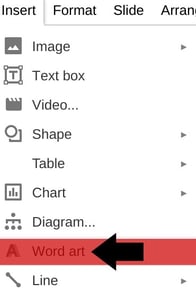
14. Word art
Another way to make your text stand out is to turn text into Word art. You can do this by click “Insert” on the top menu, then selecting “Word art.” From here, add the text you want, and then press Enter on the keyboard. You can edit the font / colors / size of the Word art the same way you would normal text.
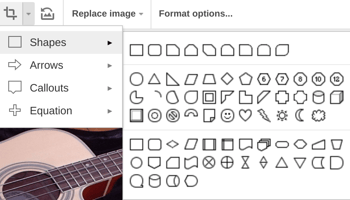
15. Use Image Masking
Google Slides does not have a lot of photo editing options, but one that is very helpful is the Mask tool; this tool lets you change any image into a shape (such as a heart or lightning bolt). To use this tool, click the arrow next to the Crop button in the formatting menu, and then select the Shape that you want to use.
16. Undo all changes
If you are working with several people on a Presentation, version history is important; with Slides you can easily undo all changes a person made. To do this, go to File > Version history > See version history.
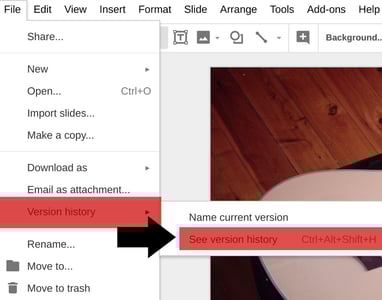
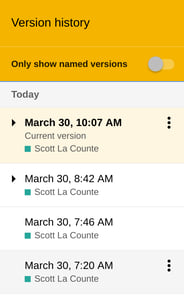
This will bring up a Version history menu; from here you can look through all changes and revert back to the one you want to go back to.
17. Create a shared folder
If you are working with others, having one folder that everyone shares from in Google will help you stay organized. From here, you can easily add both images and docs that you are using in a Presentation. To do this, go to your Google Drive and right-click on the folder you want to share, then select “Share.” If there are people outside your organization (i.e. with a different email extension), then you’ll want to make sure you share it with anyone with a link.
18. Skip and sync slides
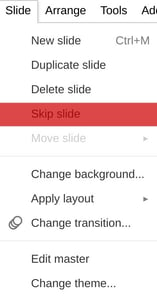
If you don’t want to have several Presentations for different seasons, or if you reuse the Presentation, but don’t always cover the same topics, then the Skip slide feature is useful. With Skip slide, you could, for example, have a Presentation for your digital signage with all school holidays; you could have it skipping all slides not related to the current holiday. To use this feature, click on “Slide” on the top menu, and then “Skip slide.”
19. Google Keep
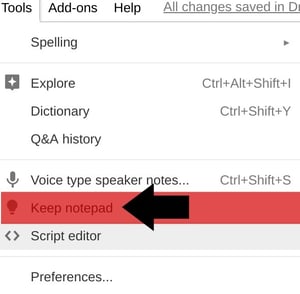
Windows has Notepad; iPhone has Notes; Google has Keep. Keep was introduced in 2013 as a simple way to keep track of ideas. In Slides it’s an easy way to jot notes of things you are thinking about but may not include in a presentation--such as a chart or infographic you just want to reference back to. Keep has a native iPhone and Android app and they can sync seamlessly to any Presentation. To use it, go to “Tools” in the top menu, and “Keep notepad.”
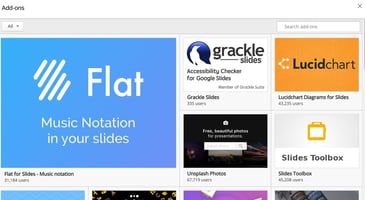
20. Use an add-on
Don’t rely on Google for all of your features; on the top menu, there’s an option for “Add-ons.” Add-ons are both free and paid, and give you access to hundreds of tools just for slides--from importing charts to using stock photos.
21. Export your presentation
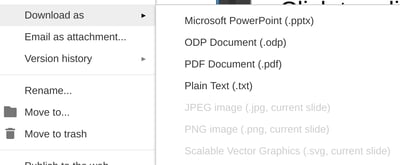
Google Slides lives in the cloud, but you can still download and even export your presentations. To do this go to “File” from the top menu, and select “Download as”; from here, you’ll have several different options.
22. Edit your presentation without a computer
Most people who use Google Slides use it on their computer; Slides is available on almost every phone and tablet as a native app. Using the native apps syncs with what you have already created, so if you change on your phone, you’ll see it on your computer.
Now that you are up-to-speed on Slide features, create a free Rise Vision and use Slides with your digital signage. Not sure why your school would need digital signage? Check out our post on 50+ things a school can do with it. You can also check out our school digital signage best practice post.
Comments
Post a Comment